Websites like Midjourney and DALL-E have gained significant popularity in recent months or years for their ability to generate creative and imaginative images using AI. If you’re a beginner web developer, have you ever considered creating your own version of an AI image generator website? The great news is that with the help of only HTML, CSS, and JavaScript, you too can build a website like Midjourney or DALL-E.
If you’re unfamiliar, Midjourny and DALL-E are AI image-generation websites. They use a machine-learning model to create images based on text descriptions. Users can input their desired image prompt, and these websites will generate a corresponding image that matches the description.
In this blog post, I will provide a step-by-step guide on how to build your own website for generating AI images using HTML, CSS, and JavaScript. The website will be built entirely from scratch using pure JavaScript. So, as a beginner, you can gain practical experience by applying your newly learned HTML, CSS, and JavaScript skills to real-world web projects.
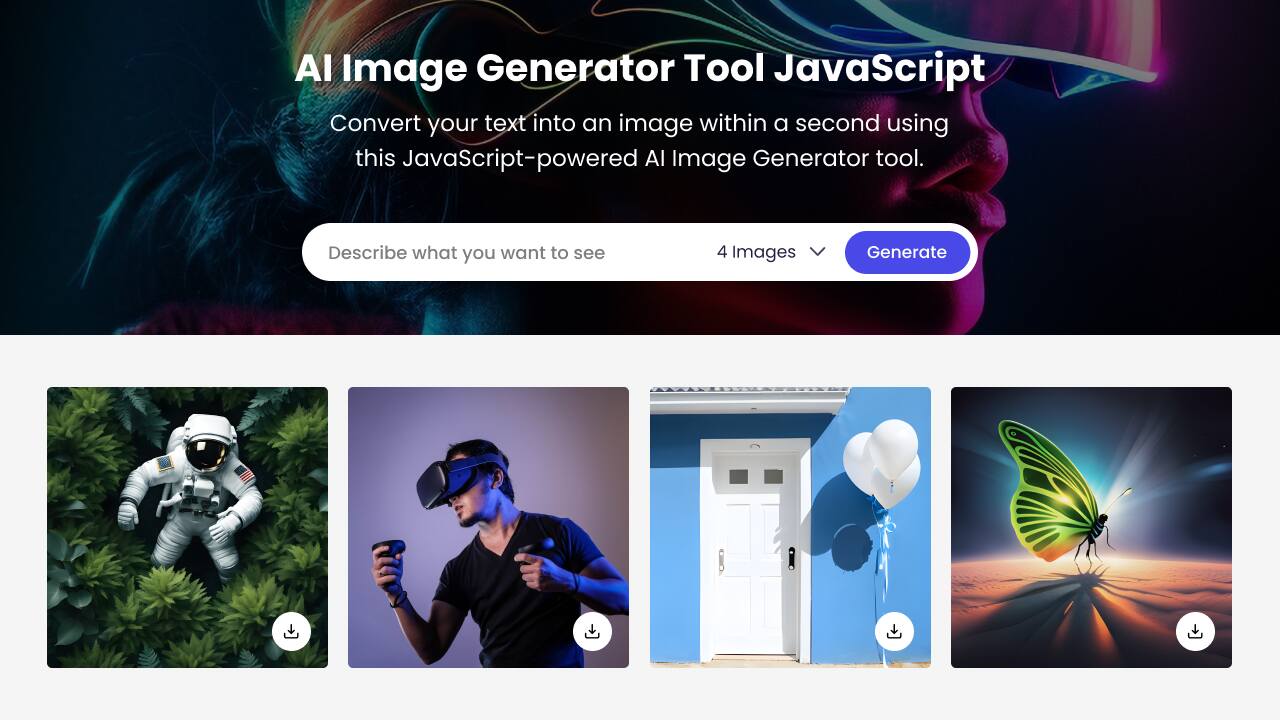
On this custom AI image generation website, users enter their prompt, choose the number of images they want to generate, and click the “Generate” button. The AI will then create images based on the user prompt. To download each image, the user can click on the corresponding download button provided.
Video Tutorial of AI Image Generator HTML and JavaScript
If you enjoy learning through video tutorials, the above YouTube video can be an excellent resource. In the video, I’ve explained each line of code and included informative comments to make building your own AI image generator website simple and easy to follow.
However, if you like reading blog posts or want a step-by-step guide for this project, you can continue reading this post. By the end of this post, you will have your own AI image generator website that you can showcase with your friends and include in your portfolio.
Steps to Build AI Image Generator Website HTML & JavaScript
To build an AI image generator website using HTML, CSS, and vanilla JavaScript, follow these simple step-by-step instructions:
- First, create a folder with any name you like. Then, make the necessary files inside it.
- Create a file called
index.htmlto serve as the main file. - Create a file called
style.cssfor the CSS code. - Create a file called
script.jsfor the JavaScript code. - Finally, download the Images folder and put it in your project directory. This folder contains default showcase images for the website. You can also use your own images.
To start, add the following HTML codes to your index.html file. These codes include essential HTML markup with different semantic tags, such as div, form, input, button, image, etc., to build the website layout.
<!DOCTYPE html>
<!-- Coding By CodingNepal - www.codingnepalweb.com -->
<html lang="en">
<head>
  <meta charset="UTF-8">
  <meta name="viewport" content="width=device-width, initial-scale=1.0">
  <title>AI Image Generator HTML CSS and JavaScript | CodingNepal</title>
  <link rel="stylesheet" href="style.css">
  <script src="script.js" defer></script>
</head>
<body>
  <section class="image-generator">
    <div class="content">
      <h1>AI Image Generator Tool JavaScript</h1>
      <p>Convert your text into an image within a second using this
        JavaScript-powered AI Image Generator tool.</p>
      <form action="#" class="generate-form">
        <input class="prompt-input" type="text" placeholder="Describe what you want to see" required>
        <div class="controls">
          <select class="img-quantity">
            <option value="1">1 Image</option>
            <option value="2">2 Images</option>
            <option value="3">3 Images</option>
            <option value="4" selected>4 Images</option>
          </select>
          <button type="submit" class="generate-btn">Generate</button>
        </div>
      </form>
    </div>
  </section>
  <section class="image-gallery">
    <div class="img-card"><img src="images/img-1.jpg" alt="image"></div>
    <div class="img-card"><img src="images/img-2.jpg" alt="image"></div>
    <div class="img-card"><img src="images/img-3.jpg" alt="image"></div>
    <div class="img-card"><img src="images/img-4.jpg" alt="image"></div>
  </section>
</body>
</html>
Next, add the following CSS codes to your style.css file to make your AI image generator website beautiful and user-friendly. You can customize the different CSS properties, such as color, background, font, etc., to give a personalized touch to your website. Now, if you load the web page in your browser, you can see your AI image generator website with four preloaded images.
/* Importing Google font - Poppins */
@import url("https://fonts.googleapis.com/css2?family=Poppins:wght@400;500;600;700&display=swap");

* {
  margin: 0;
  padding: 0;
  box-sizing: border-box;
  font-family: "Poppins", sans-serif;
}

.image-generator {
  height: 40vh;
  display: flex;
  align-items: center;
  justify-content: center;
  position: relative;
  background: url("images/bg.jpg");
  background-size: cover;
  background-position: center;
}

.image-generator::before {
  content: "";
  position: absolute;
  left: 0;
  top: 0;
  width: 100%;
  height: 100%;
  opacity: 0.5;
  background: #121212;
}

.image-generator .content {
  position: relative;
  color: #fff;
  padding: 0 15px;
  max-width: 760px;
  text-align: center;
}

.image-generator h1 {
  font-size: 2.5rem;
  font-weight: 700;
}

.image-generator p {
  margin-top: 10px;
  font-size: 1.35rem;
}

.image-generator .generate-form {
  height: 56px;
  padding: 6px;
  display: flex;
  margin-bottom: 15px;
  background: #fff;
  align-items: center;
  border-radius: 30px;
  margin-top: 45px;
  justify-content: space-between;
}

.generate-form .prompt-input {
  width: 100%;
  height: 100%;
  outline: none;
  padding: 0 17px;
  border: none;
  background: none;
  font-size: 1rem;
  border-radius: 30px;
}

.generate-form .controls {
  display: flex;
  height: 100%;
  gap: 15px;
}

.generate-form .img-quantity {
  outline: none;
  border: none;
  height: 44px;
  background: none;
  font-size: 1rem;
}

.generate-form .generate-btn {
  font-size: 1rem;
  outline: none;
  border: none;
  font-weight: 500;
  color: #fff;
  cursor: pointer;
  height: 100%;
  padding: 0 25px;
  border-radius: 30px;
  background: #4949E7;
}

.generate-form .generate-btn[disabled] {
  opacity: 0.6;
  pointer-events: none;
}

.generate-form button:hover {
  background: #1d1de2;
}

.image-gallery {
  display: flex;
  gap: 15px;
  padding: 0 15px;
  flex-wrap: wrap;
  justify-content: center;
  margin: 50px auto;
  max-width: 1250px;
}

.image-gallery .img-card {
  display: flex;
  position: relative;
  align-items: center;
  justify-content: center;
  background: #f2f2f2;
  border-radius: 4px;
  overflow: hidden;
  aspect-ratio: 1 / 1;
  width: 285px;
}

.image-gallery .img-card img {
  height: 100%;
  width: 100%;
  object-fit: cover;
}

.image-gallery .img-card.loading img {
  width: 80px;
  height: 80px;
}

.image-gallery .img-card .download-btn {
  bottom: 15px;
  right: 15px;
  height: 36px;
  width: 36px;
  display: flex;
  align-items: center;
  justify-content: center;
  text-decoration: none;
  background: #fff;
  border-radius: 50%;
  position: absolute;
  opacity: 0;
  pointer-events: none;
  transition: 0.2s ease;
}

.image-gallery .img-card .download-btn img {
  width: 14px;
  height: 14px;
}

.image-gallery .img-card:not(.loading):hover .download-btn {
  opacity: 1;
  pointer-events: auto;
}

@media screen and (max-width: 760px) {
  .image-generator {
    height: 45vh;
    padding-top: 30px;
    align-items: flex-start;
  }

  .image-generator h1 {
    font-size: 1.8rem;
  }

  .image-generator p {
    font-size: 1rem;
  }

  .image-generator .generate-form {
    margin-top: 30px;
    height: 52px;
    display: block;
  }

  .generate-form .controls {
    height: 40px;
    margin-top: 15px;
    justify-content: end;
    align-items: center;
  }

  .generate-form .generate-btn[disabled] {
    opacity: 1;
  }

  .generate-form .img-quantity {
    color: #fff;
  }

  .generate-form .img-quantity option {
    color: #000;
  }

  .image-gallery {
    margin-top: 20px;
  }

  .image-gallery .img-card:not(.loading) .download-btn {
    opacity: 1;
    pointer-events: auto;
  }
}

@media screen and (max-width: 500px) {
  .image-gallery .img-card {
    width: 100%;
  }
}
Finally, add the following JavaScript code to your script.js file to make your AI image generator website functional. This code handles various functions, even listeners, input handling, API calls, image rendering, etc. to generate AI images based on user prompts.
const generateForm = document.querySelector(".generate-form");
const generateBtn = generateForm.querySelector(".generate-btn");
const imageGallery = document.querySelector(".image-gallery");

const OPENAI_API_KEY = "YOUR-OPENAI-API-KEY-HERE"; // Your OpenAI API key here
let isImageGenerating = false;

const updateImageCard = (imgDataArray) => {
  imgDataArray.forEach((imgObject, index) => {
    const imgCard = imageGallery.querySelectorAll(".img-card")[index];
    const imgElement = imgCard.querySelector("img");
    const downloadBtn = imgCard.querySelector(".download-btn");

    // Set the image source to the AI-generated image data
    const aiGeneratedImage = `data:image/jpeg;base64,${imgObject.b64_json}`;
    imgElement.src = aiGeneratedImage;

    // When the image is loaded, remove the loading class and set download attributes
    imgElement.onload = () => {
      imgCard.classList.remove("loading");
      downloadBtn.setAttribute("href", aiGeneratedImage);
      downloadBtn.setAttribute("download", `${new Date().getTime()}.jpg`);
    }
  });
}

const generateAiImages = async (userPrompt, userImgQuantity) => {
  try {
    // Send a request to the OpenAI API to generate images based on user inputs
    const response = await fetch("https://api.openai.com/v1/images/generations", {
      method: "POST",
      headers: {
        "Content-Type": "application/json",
        "Authorization": `Bearer ${OPENAI_API_KEY}`,
      },
      body: JSON.stringify({
        prompt: userPrompt,
        n: userImgQuantity,
        size: "512x512",
        response_format: "b64_json"
      }),
    });

    // Throw an error message if the API response is unsuccessful
    if(!response.ok) throw new Error("Failed to generate AI images. Make sure your API key is valid.");

    const { data } = await response.json(); // Get data from the response
    updateImageCard([...data]);
  } catch (error) {
    alert(error.message);
  } finally {
    generateBtn.removeAttribute("disabled");
    generateBtn.innerText = "Generate";
    isImageGenerating = false;
  }
}

const handleImageGeneration = (e) => {
  e.preventDefault();
  if(isImageGenerating) return;

  // Get user input and image quantity values
  const userPrompt = e.srcElement[0].value;
  const userImgQuantity = parseInt(e.srcElement[1].value);

  // Disable the generate button, update its text, and set the flag
  generateBtn.setAttribute("disabled", true);
  generateBtn.innerText = "Generating";
  isImageGenerating = true;

  // Creating HTML markup for image cards with loading state
  const imgCardMarkup = Array.from({ length: userImgQuantity }, () =>
      `<div class="img-card loading">
        <img src="images/loader.svg" alt="AI generated image">
        <a class="download-btn" href="#">
          <img src="images/download.svg" alt="download icon">
        </a>
      </div>`
  ).join("");

  imageGallery.innerHTML = imgCardMarkup;
  generateAiImages(userPrompt, userImgQuantity);
}

generateForm.addEventListener("submit", handleImageGeneration);
Please note that your website is still unable to generate AI images because you have not provided your API key in the OPENAI_API_KEY variable. We’re using OpenAI API to generate images. So to get a free API key from OpenAI, sign up for an account at https://platform.openai.com/account/api-keys.
” Remember that when you sign up for OpenAI, you’ll get a free $5 credit for your API usage. If your account is older than 3 months or the credit runs out, you’ll need a paid account or create a new one with a new number to keep using the API. Your API usage and expiration date can be found on the account’s usage page.”
To understand the JavaScript code better, I recommend watching the above video tutorial, reading the code comments, and experimenting with the code.
Conclusion and Final words
In conclusion, building your own AI-powered image generation website is not just an exciting project but also a valuable opportunity to apply your web development skills to projects that are increasingly in demand in today’s digital world.
By following the steps outlined in this article, I believe that you have successfully created your own unique version of an AI image generator. Feel free to experiment with different styles and features to take your website to the next level. To further improve your skills, I recommend you try creating a ChatGPT clone, chatbot, or image search engine.
If you encounter any problems while building your AI-powered image generation website, you can download the source code files for this project for free by clicking the Download button. Remember that after downloading the file, you’ll have to provide your valid OpenAI API key into the OPENAI_API_KEY variable in the script.js file.

